GPU from Silicon to Container, Part 2: GPU Sharing Strategies in Kubernetes
Part 2 of a 3-part series on how Kubernetes makes GPUs accessible to containers. This part covers splitting a single physical GPU across multiple workloads. Start with Part 1 if you haven’t yet.
Introduction
In Part 1 we traced a GPU from silicon to a scheduled pod via the device-plugin path, with each pod getting exclusive use of a whole GPU. Default Kubernetes scheduling assigns GPUs as atomic units, and most workloads don’t come close to using a whole card. This part covers the options for splitting one: time-slicing, MPS, MIG, HAMi, and vGPU, and what each trades away to do it.
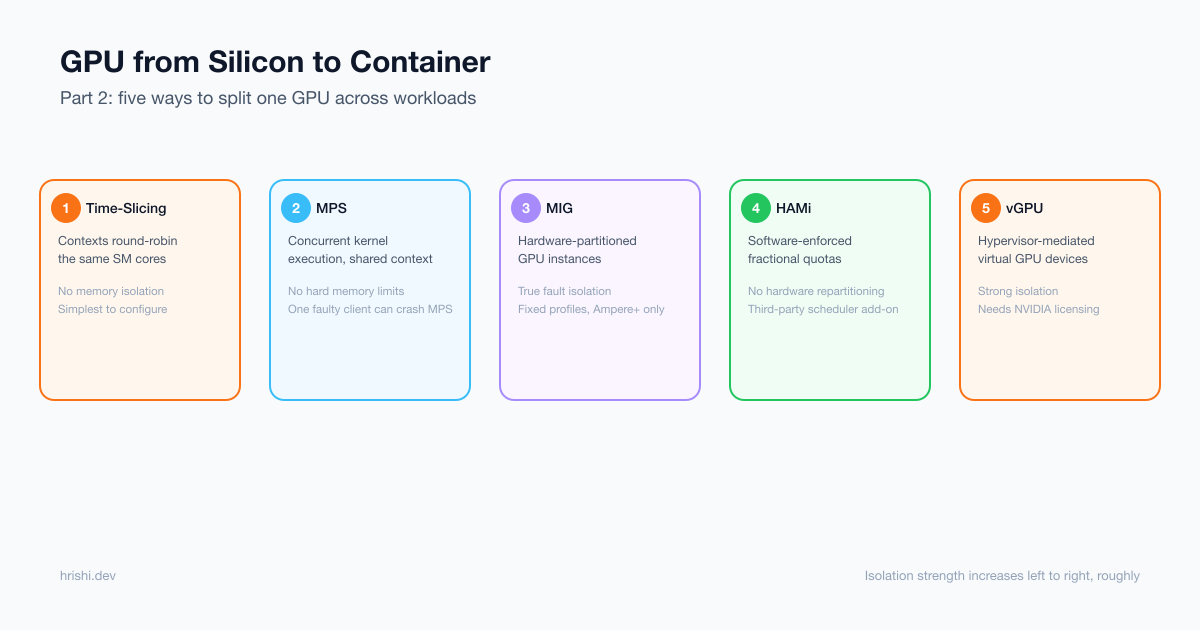
Table of Contents
Sharing
GPU Device Sharing
When a lightweight container requests a GPU, it monopolizes the entire device regardless of actual compute or memory utilization. A typical inference service uses only a fraction of a GPU’s compute and a slice of its VRAM, leaving the rest idle; that’s the gap this section closes. Effective GPU utilization is core to operating a fleet of GPUs for inference, serving, training, or HPC workloads.
GPU Sharing Options
1. GPU Time-Slicing
For workloads that don’t require full GPU utilization, time-slicing allows multiple containers to share a single GPU.
Device Plugin ConfigMap
This ConfigMap configures the NVIDIA device plugin, which implements Kubernetes’ device plugin framework for advertising specialized hardware to the kubelet:
apiVersion: v1
kind: ConfigMap
metadata:
  name: nvidia-device-plugin-config
  namespace: kube-system
data:
  config.yaml: |
    version: v1
    sharing:
      timeSlicing:
        replicas: 4
        renameByDefault: false
        failRequestsGreaterThanOne: true
    resources:
      - name: nvidia.com/gpu
        devices: all
All containers:
- See the same GPU device
- Create separate CUDA contexts
- GPU hardware time-multiplexes between contexts
- No memory isolation (pods can see each other’s allocations!)
Why “Time-Slicing” Oversells What’s Happening
Time-slicing doesn’t divide the GPU: it still runs exactly one context at a time, just in very short turns, which makes it look like concurrent sharing from the outside.
Time-slicing shares a GPU by using hardware context switches, but because saving and restoring massive tensor footprints, registers, and cache states overhead is high, performance degrades significantly under heavy use. It works well for bursty, spiky inference or development workloads, but fails on saturated training jobs. It’s a Kubernetes-level configuration for the NVIDIA device plugin / GPU Operator, not a GPU driver setting, so there’s no enforcement from the GPU, OS, or CUDA runtime, and a tenant submitting back-to-back work can hold the card continuously while neighboring tasks stall.
In Kubernetes, setting timeSlicing.replicas simply tricks the control plane into advertising a single GPU as multiple schedulable units, leaving pods to battle for access at the silicon level. Crucially, memory is neither metered nor isolated: all pods draw from a single shared pool. As a result, one pod’s memory leak or over-allocation routinely triggers cascading Out-of-Memory (OOM) crashes for whichever unrelated pod happens to request memory next.
nvidia-smi Has No Time-Slicing Toggle
Time-slicing isn’t something you turn on; it’s the default behavior whenever multiple processes hold CUDA contexts on a GPU without MIG or MPS, so there’s nothing to configure at the nvidia-smi layer. What it can control is adjacent, not equivalent: compute mode, which governs whether multiple contexts are even allowed to coexist:
nvidia-smi -i 0 -c DEFAULT            # multiple processes can share (default)
nvidia-smi -i 0 -c EXCLUSIVE_PROCESS  # only one process at a time
nvidia-smi -i 0 -c PROHIBITED         # no compute processes allowed
Time-Slicing Summary
- Broad compatibility: works on any GPU architecture: a ConfigMap change, no MIG hardware, no driver reboot.
- Good for bursty workloads: reclaims idle GPU cycles between spiky inference or dev requests.
- No isolation: no memory or QoS boundaries, so compute-heavy pods can starve neighbors.
- Cascading OOM: one pod’s leak crashes whichever pod happens to allocate next, not necessarily the culprit.
2. NVIDIA MPS (Multi-Process Service)
Time-slicing gives each process the whole GPU in turn; MPS instead lets multiple processes run on the GPU
concurrently, through a shared context, as described in NVIDIA’s MPS documentation.
A daemon (nvidia-cuda-mps-control) sits between the processes and the
driver and merges their kernel submissions into a single context, so the GPU can interleave work from different
containers within the same execution window instead of context-switching between fully separate ones.
Without MPS                          With MPS
Process A ─┐                         Process A ─┐
Process B ─┼→ separate contexts      Process B ─┼→ MPS daemon → one shared context → GPU
Process C ─┘   (time-sliced)         Process C ─┘   (concurrent kernel execution)
Practically, this matters for many small, low-occupancy kernels (MPI-style multi-process workloads, or several lightweight inference processes) that don’t individually saturate the SMs. Time-slicing would serialize them and waste the idle capacity each one leaves on the table; MPS packs their kernels onto the GPU together instead.
What it doesn’t give you:
- No memory isolation. All clients share the daemon’s context, so one process can allocate its way into starving the others, the same failure mode as time-slicing on that front.
- A single misbehaving client can take down the daemon, which takes every other client sharing it down too. In Kubernetes terms, that turns one pod’s crash into an outage for every other pod scheduled onto the same MPS set.
- No per-client fault isolation. MPS clients are cooperating processes under one shared context, not walled-off instances.
On Kubernetes, the device plugin’s sharing.mps mode (the sibling config to timeSlicing shown earlier) is what
wires this up: it starts the control daemon on the node and hands each pod a client ID instead of a full GPU.
It’s a reasonable middle ground when workloads are trusted and cooperative but still need real concurrent
execution rather than turn-taking. HAMi’s libvgpu.so approach (below) targets the same “trusted but resource-
starved” niche with per-pod metering instead of a shared context, which is why the two are worth comparing rather
than treating MPS as strictly better or worse.
3. Multi-Instance GPU (MIG)
This isn’t a scheduler trick: the GPU’s memory controllers and streaming multiprocessors (SMs) are physically fenced off per instance, so one tenant’s workload literally cannot see or starve another’s.
MIG requires certain generation silicon or newer; A100 was the first GPU to support it, and it carries forward on A30, H100, H200, and Blackwell-class data-center cards.
MIG Architecture
MIG partitioning, as documented in NVIDIA’s MIG User Guide, happens in two layers, and it’s worth keeping them distinct because the CLI and the Kubernetes device plugin both expose this split:
- GPU Instance (GI): carves off a fixed slab of VRAM with its own memory controllers. This is the hardware boundary; two GIs cannot see each other’s memory even if the host is compromised.
- Compute Instance (CI): carves dedicated SMs inside a GI for execution. A CI can’t exist without a parent GI, and the CLI enforces that ordering: you destroy CIs before you can destroy their GI.
A single A100 (40GB) can be sliced into up to 7 instances:
Physical A100 (40GB)
├─ MIG Instance 0: 3g.20gb (3 compute slices, 20GB memory)
├─ MIG Instance 1: 3g.20gb (3 compute slices, 20GB memory)
├─ MIG Instance 2: 2g.10gb (2 compute slices, 10GB memory)
└─ MIG Instance 3: 1g.5gb  (1 compute slice, 5GB memory)
Each MIG instance:
- Has dedicated compute resources (streaming multiprocessors)
- Has dedicated memory partition
- Provides hardware-level isolation
- Appears as a separate GPU device
MIG Device Management
# Enable MIG mode

$ sudo nvidia-smi -i 0 -mig 1
All done.
# List All Profile

$ sudo nvidia-smi mig -i 0 -lgip
+-------------------------------------------------------------------------------+
| GPU instance profiles:                                                        |
| GPU   Name               ID    Instances   Memory     P2P    SM    DEC   ENC  |
|                                Free/Total   GiB              CE    JPEG  OFA  |
|===============================================================================|
|   0  MIG 1g.10gb         19     7/7        9.75       No     16     1     0   |
|                                                               1     1     0   |
+-------------------------------------------------------------------------------+
|   0  MIG 1g.10gb+me      20     1/1        9.75       No     16     1     0   |
|                                                               1     1     1   |
+-------------------------------------------------------------------------------+
|   0  MIG 1g.20gb         15     4/4        19.62      No     26     1     0   |
|                                                               1     1     0   |
+-------------------------------------------------------------------------------+
|   0  MIG 2g.20gb         14     3/3        19.62      No     32     2     0   |
|                                                               2     2     0   |
+-------------------------------------------------------------------------------+
|   0  MIG 3g.40gb          9     2/2        39.50      No     60     3     0   |
|                                                               3     3     0   |
+-------------------------------------------------------------------------------+
|   0  MIG 4g.40gb          5     1/1        39.50      No     64     4     0   |
|                                                               4     4     0   |
+-------------------------------------------------------------------------------+
|   0  MIG 7g.80gb          0     1/1        79.25      No     132    7     0   |
|                                                               8     7     1   |
+-------------------------------------------------------------------------------+
# Create GPU Instances (GI): using profile IDs from your -lgip output. Example: one 3g.40gb (ID 9) and one 2g.20gb (ID 14):

$ sudo nvidia-smi mig -i 0 -cgi 9,14
Successfully created GPU instance ID  2 on GPU  0 using profile MIG 3g.40gb (ID  9)
Successfully created GPU instance ID  3 on GPU  0 using profile MIG 2g.20gb (ID 14)
# List GIs to confirm IDs

$ sudo nvidia-smi mig -i 0 -lgi
+---------------------------------------------------------+
| GPU instances:                                          |
| GPU   Name               Profile  Instance   Placement  |
|                            ID       ID       Start:Size |
|=========================================================|
|   0  MIG 2g.20gb           14        3          0:2     |
+---------------------------------------------------------+
|   0  MIG 3g.40gb            9        2          4:4     |
+---------------------------------------------------------+
# Create Compute Instances (CI) inside each GI: using the default profile that consumes the full GI

$ sudo nvidia-smi mig -i 0 -gi 2 -cci
Successfully created compute instance ID  0 on GPU  0 GPU instance ID  2 using profile MIG 3g.40gb (ID  2)

$ sudo nvidia-smi mig -i 0 -gi 3 -cci
Successfully created compute instance ID  0 on GPU  0 GPU instance ID  3 using profile MIG 2g.20gb (ID  1)
# List CIs to confirm

$ sudo nvidia-smi mig -i 0 -lci
+--------------------------------------------------------------------+
| Compute instances:                                                 |
| GPU     GPU       Name             Profile   Instance   Placement  |
|       Instance                       ID        ID       Start:Size |
|         ID                                                         |
|====================================================================|
|   0      3       MIG 2g.20gb          1         0          0:2     |
+--------------------------------------------------------------------+
|   0      2       MIG 3g.40gb          2         0          0:4     |
+--------------------------------------------------------------------+
# New device files appear
$ ls -l /dev/nvidia*
  crw-rw-rw- 1 root root 195, 254 Aug  9 09:11 /dev/nvidia-modeset
  crw-rw-rw- 1 root root 236, 255 Aug  9 09:11 /dev/nvidia-nvswitchctl
  crw-rw-rw- 1 root root 511,   0 Aug  9 09:11 /dev/nvidia-uvm
  crw-rw-rw- 1 root root 511,   1 Aug  9 09:11 /dev/nvidia-uvm-tools
  crw-rw-rw- 1 root root 195,   0 Aug  9 09:11 /dev/nvidia0
  crw-rw-rw- 1 root root 195, 255 Aug  9 09:11 /dev/nvidiactl

  /dev/nvidia-caps:
  total 0
  cr-------- 1 root root 238,  1 Aug  9 09:11 nvidia-cap1
  cr--r--r-- 1 root root 238, 12 Aug  9 10:43 nvidia-cap12
  cr--r--r-- 1 root root 238, 13 Aug  9 10:44 nvidia-cap13
  cr--r--r-- 1 root root 238,  2 Aug  9 09:11 nvidia-cap2
  cr--r--r-- 1 root root 238, 21 Aug  9 10:42 nvidia-cap21
  cr--r--r-- 1 root root 238, 22 Aug  9 10:45 nvidia-cap22
  cr--r--r-- 1 root root 238,  3 Aug  9 11:55 nvidia-cap3
  cr--r--r-- 1 root root 238, 30 Aug  9 12:02 nvidia-cap30
  cr--r--r-- 1 root root 238, 31 Aug  9 12:06 nvidia-cap31
  cr--r--r-- 1 root root 238,  4 Aug  9 11:55 nvidia-cap4

$ for f in /proc/driver/nvidia/capabilities/gpu0/mig/gi*/ci*/access; do
  gi=$(echo "$f" | grep -oP 'gi\K[0-9]+')
  ci=$(echo "$f" | grep -oP 'ci\K[0-9]+')
  minor=$(grep DeviceFileMinor "$f" | awk '{print $2}')
  echo "GI $gi / CI $ci -> nvidia-cap$minor"
done

GI 2 / CI 0 -> nvidia-cap22
GI 3 / CI 0 -> nvidia-cap31
MIG in Kubernetes
The NVIDIA Device Plugin discovers MIG instances and advertises them as separate resources:
apiVersion: v1
kind: Node
status:
  capacity:
    nvidia.com/mig-3g.20gb: "2"
    nvidia.com/mig-1g.5gb: "1"
  allocatable:
    nvidia.com/mig-3g.20gb: "2"
    nvidia.com/mig-1g.5gb: "1"
#Pods can request specific MIG profiles:
apiVersion: v1
kind: Pod
metadata:
  name: mig-pod
spec:
  containers:
  - name: cuda-app
    image: nvidia/cuda:11.8.0-base-ubuntu22.04
    resources:
      limits:
        nvidia.com/mig-3g.20gb: 1  # Request one 3g.20gb instance
MIG Benefits
The isolation here is real because it’s physical, not scheduled: each GPU Instance owns its own slice of memory controllers, L2 cache, and DRAM, and each Compute Instance runs on SMs the GPU firmware has fenced off from every other instance’s SMs. Contrast that with time-slicing and MPS above, where “isolation” really means a shared pool that trusts every co-tenant to behave.
- True hardware isolation. A workload’s memory and SMs simply don’t exist from another instance’s point of view; there’s no OOM contagion the way there is with time-slicing’s shared pool or MPS’s shared context.
- Guaranteed compute and memory bandwidth. An instance’s SM and memory-controller allocation is fixed at creation time, so a neighbor running a compute-bound kernel can’t steal cycles the way it can under time-slicing.
- Fault isolation. An uncorrectable ECC error or Xid fault inside one GI is contained to that instance; it doesn’t take down the whole GPU or any other tenant’s CI, unlike an MPS daemon crash, which kills every client attached to it.
-
QoS guarantees. Because the split is enforced by hardware,
3g.20gbalways means exactly that much SM and memory for the life of the instance, not a statistical average across however many neighbors happen to be scheduled at once.
MIG Trade-offs
-
Only whole, predefined profiles. The GPU is partitioned into whatever profiles the hardware supports
(
1g.5gb,3g.20gb, …): you can’t ask for an arbitrary split, only the combinations NVIDIA has defined for that silicon generation, and not every profile combination can coexist on the same GPU at once (placement matters; see theStart:Sizecolumn in the-lgioutput above). - Reconfiguration takes the GPU offline. Reshaping the layout means destroying and recreating instances, which briefly interrupts every workload on that card, not just the one being resized. This is why the GPU Operator’s MIG Manager drains a node before it touches the layout (see below).
- Hardware-gated. Only NVIDIA’s data-center-class silicon supports it (A100, H100, and newer; no consumer or older data-center cards), so unlike time-slicing it isn’t something you can reach for on arbitrary hardware.
- Fixed-size fit, not elastic. Profiles suit steady-state, predictable workloads (multi-tenant inference at a known QPS) far better than bursty or variable-sized jobs, which either waste part of a profile they don’t fully use or don’t fit any profile at all.
- CIs must be torn down before their GI. The CLI enforces destroy-children-before-parent ordering, so shrinking one tenant’s slice to grow another’s is a multi-step, workload-interrupting operation, not a live resize.
Who Actually Stands MIG Up
None of the above happens by hand-running nvidia-smi on every node in a real cluster. In practice the NVIDIA
GPU Operator owns the whole stack (kernel driver, container toolkit, and device plugin) as a set of
DaemonSets, and a companion MIG Manager DaemonSet watches a node label to decide the partition layout:
# Point every GPU on the node at a uniform 1g.24gb-style layout
kubectl label node <node-name> nvidia.com/mig.config=all-1g.24gb --overwrite

# Revert to whole, unpartitioned GPUs
kubectl label node <node-name> nvidia.com/mig.config=all-disabled --overwrite
The manager reacts to that label by draining workloads, resetting the GPU, and re-carving instances; no manual
nvidia-smi mig -cgi sequence required once it’s running. Mixed geometries (say, one 2g.48gb slice alongside
two 1g.24gb slices on the same card) are still possible, just via a custom mig-parted ConfigMap instead of the
canned label values.
Standing up a MIG-enabled node this way has its own set of sharp edges; see GPU Operator Troubleshooting in Part 3’s Operations section for the failure modes worth budgeting time for.
4. HAMi: Fractional GPUs Without Repartitioning Hardware
MIG solves fragmentation by cutting the GPU into fixed, hardware-defined shapes. That’s great for predictable
multi-tenant inference, but it has a rigidity problem: a 1g.24gb slice is a 1g.24gb slice, and reshaping the
layout means draining pods and resetting the card. Time-slicing goes the other direction: infinitely flexible,
zero isolation. HAMi (Heterogeneous AI Computing Virtualization, a CNCF Incubating project) sits between the
two: it keeps the GPU whole at the hardware level and instead adds a software layer that meters memory and
compute per pod, changeable purely through the pod spec.
How the sharing model actually works
Where the device plugin flow in Kubernetes GPU Scheduling (Part 1) only ever hands out whole GPU UUIDs, HAMi inserts itself at four points in that flow:
Pod requests nvidia.com/gpu + gpumem + gpucores
              ↓
Mutating webhook reroutes the pod to the HAMi scheduler extender
              ↓
HAMi scheduler checks aggregate count / memory / compute budgets
across the cluster before binding (not just device count)
              ↓
HAMi device plugin allocates a logical slot and injects libvgpu.so
into the container via LD_PRELOAD
              ↓
libvgpu.so intercepts CUDA memory-allocation and kernel-launch calls
at runtime, enforcing the pod's memory ceiling and compute-time share
The pod spec gains two extended resources beyond the familiar nvidia.com/gpu count:
resources:
  limits:
    nvidia.com/gpu: 1        # a physical GPU, possibly shared with other pods
    nvidia.com/gpumem: 8000  # hard ceiling in MiB
    nvidia.com/gpucores: 10  # compute-time share, in percent
  requests:
    nvidia.com/gpu: 1
    nvidia.com/gpumem: 8000
    nvidia.com/gpucores: 10
A cluster with eight physical GPUs and a deviceSplitCount of 10 exposes 80 schedulable slots: that’s 80
scheduling opportunities, not 80 GPUs or a memory multiplier. The scheduler is doing admission control against
the real 8-card, N-gigabyte budget underneath.
Where this differs from MIG in ways that matter operationally
-
Isolation is enforced in userspace, not silicon.
libvgpu.sopolices allocations at the CUDA API boundary. A workload that goes around it (a static binary calling the driver directly, or one settingCUDA_DISABLE_CONTROL) can slip past the memory ceiling. Treat HAMi as resource governance for cooperative, trusted workloads, not as a tenant security boundary; adversarial multi-tenancy is still MIG’s job. -
nvidia.com/gpu: 1alone means the whole card. Forgettinggpumem/gpucoresdoesn’t yield some sane default fraction; it grants exclusive access to 100% of memory and compute, silently defeating the point of installing HAMi in the first place. -
Requests must equal limits. Kubernetes extended resources aren’t overcommittable, so a mismatched
request/limit pair for
gpumemorgpucoresis rejected at admission, before the scheduler even runs. -
The failure mode is a clean OOM, not a crash. When one pod’s actual usage exceeds its
gpumemceiling, HAMi-Core returns a CUDA out-of-memory error to that process specifically; neighboring pods sharing the same card keep running untouched. That’s the practical payoff of the interception approach: a noisy-neighbor incident stays contained to the pod that caused it. - Two separate metrics endpoints matter for capacity planning: the scheduler exposes what it has promised (aggregate allocation across the cluster), while the device plugin exposes what’s actually being consumed per container. Reading only one side hides either over-subscription risk or real headroom, depending on which one you skip.
HAMi is the better fit when workloads are numerous, small, and variable in size (dev notebooks, small inference services, CI GPU jobs) where carving fixed MIG profiles would waste capacity or require constant reshaping. MIG remains the better fit once isolation has to survive a hostile or untrusted tenant, not just a well-behaved one.
5. vGPU (Virtual GPU)
NVIDIA vGPU technology provides software-defined GPU sharing with:
- Hypervisor-level virtualization
- Memory isolation between VMs
- QoS policies and scheduling
- Live migration support
Hypervisor (VMware vSphere / KVM)
├─ VM 1: vGPU (4GB, 1/4 GPU compute)
├─ VM 2: vGPU (4GB, 1/4 GPU compute)
├─ VM 3: vGPU (8GB, 1/2 GPU compute)
└─ Physical GPU (16GB total)
Each vGPU appears as a complete GPU to the guest OS, enabling standard CUDA applications without modification. Can use the Kata containers to enable vGPU on the Kubernetes.
Note: vGPU may require an NVIDIA vGPU license.
Comparison Matrix
| Technology | Isolation | Memory | Performance | Flexibility | Use Case |
|---|---|---|---|---|---|
| Full GPU | Hardware | Dedicated | 100% | Low | Training, HPC |
| Time-Slicing | None | Shared | Variable | High | Dev/Test, Jupyter notebooks |
| MIG | Hardware | Dedicated | Guaranteed | Medium | Inference, Multi-tenant inferencing, training |
| MPS | None (shared context) | Shared | Concurrent, no throttling | Medium | Many small/cooperative processes |
| HAMi | Software (userspace intercept) | Metered, not walled off | Throttled share | High | Dev/Test, small inference, CI |
| vGPU | Software | Isolated | Good | High | VDI, Cloud VMs |
Up Next
Time-slicing, MPS, MIG, HAMi, and vGPU all get a GPU shared today, but they sit on top of the device-plugin
model covered in Part 1. Kubernetes scheduling itself is moving to a different foundation: MIG allocation becomes
first-class there, exposed as its own DeviceClass rather than a device-plugin resource name.
Part 3: CDI, DRA & Operations
covers the Container Device Interface that’s replacing vendor-specific runtime hooks, Dynamic Resource Allocation
as that next-generation scheduler, and what it takes to run all of this reliably in production.
Key Takeaways
- Time-slicing is the default behavior whenever multiple processes share a GPU without MIG or MPS: every pod gets turns on the whole device, but there’s no memory isolation, so one pod’s leak can OOM whichever neighbor happens to allocate next.
- MPS lets processes run concurrently through one shared CUDA context instead of taking turns, which helps many small, cooperative kernels, but a single misbehaving client can crash the shared daemon and take every other client down with it.
- MIG is the only option with true hardware isolation: separate memory controllers and SMs per instance. It’s limited to A100-class and newer data-center GPUs, and only in fixed, predefined profile sizes.
- HAMi meters memory and compute per pod in userspace via
libvgpu.so, giving flexible fractional GPUs on ordinary hardware, but the isolation is a software boundary that a determined workload can bypass.- vGPU pushes isolation down to the hypervisor for VM-level GPU sharing, at the cost of an NVIDIA licensing requirement.
- None of these five is universally “best.” The right pick depends on whether tenants are cooperative or adversarial, and whether you need guaranteed QoS or just want to reclaim idle GPU cycles.